

Bottle Cap Injection Molding Machine
We specialize in manufacturing and exporting injection molding machines that have a shot weight of 60-10000 grams and a clamping force of 60- 1600 tons.
Why Choose Us
Quality Guaranteed
The most notable is the ISO9001 Quality Certificate (Registered by Germany TUV Management Service). Our company is accredited for meeting international standards in management responsibility, quality control, design control, process control, customer service, and other key criteria.
Global Sales Network
Our machines are sold to more than 20 provinces in China and exported to the Middle East, Southeast Asia, Russia, Middle Asia, and Africa.
Rich Experience
We have decades of knowledge and experience to execute precise manufacturing, our high-quality SZ series automatic computerized injection molding machines and their downstream equipment using imported hydraulic and electrical seals.
Wide Product Range
Our products include general injection molding machines, servo injection molding machines, bottle cap injection molding machines, bucket/crate injection molding machines, blow molding machines, plastic mould, etc.
-
 Pet Bottles Caps Injection Molding Moulding MachineHydraulic Injection Molding Machine is the main molding equipment that uses molds to make variousAdd to Inquiry
-
 Flip Top Cap Injection Molding MachineFlip Top Cap Injection Molding Machine is a kind of special plastic molding machine. It takesAdd to Inquiry
-
 Jar Cap Injection Molding MachineJar Cap Injection Molding Machine is a special machine that uses the principle of thermalAdd to Inquiry
-
 Shampoo Cap Injection Molding MachineThe Shampoo Cap Injection Molding Machine can melt the pellets, inject them into the mold, moldAdd to Inquiry
-
 PE Plastic Water Bottle Cap Injection Molding MachinePE Plastic Water Bottle Cap Injection Molding Machine is a fully automatic injection moldingAdd to Inquiry
-
 Customized Palstic Bottle Cap Injection Molding MachineThe density of PP is smaller than that of PE, and the strength, stiffness, hardness and heatAdd to Inquiry


- Tel: +86-512-58451000
- Mob: +86-13601562785
- Email: cch@shenzhoumac.com
- Add: Fenghuang Town, Zhangjiagang City, Jiangsu Province, P.R.China
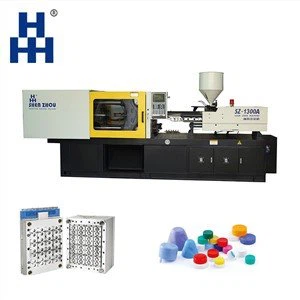
Fast mold closing and slow low-pressure mold locking action device can ensure mold safety, fast speed and increase output. The injection device and the mold locking device are on the same vertical centerline, and the mold is opened and closed along the up and down direction, with a small floor area. Bottle Cap Injection Molding Machine is easy to realize insert molding, the die surface is upward, and the insert is easy to put in and position.
Bottle Cap Injection Molding Machine is the main molding equipment for making bottle caps of various shapes with plastic molding molds. It has the function of low-voltage safety protection. The uniquely designed mold closing technology can protect personal safety and ranks in the forefront of the same industry. If there is foreign matter blocking between the upper and lower molds, the mold will not be locked forcibly, and the mold will be opened automatically. It is conducive to maintaining the accuracy of machinery and die for a long time.

Definition of Bottle Cap Injection Molding Machine
Because different plastic bottles have different caps, there are strict requirements on air tightness to ensure the safety of items stored in plastic bottles. Therefore, producing a high-quality plastic bottle cap has high requirements on the performance of the injection molding machines. Our bottle cap injection molding machines are suitable for the production of multi-cavity mineral water bottle caps, flip-top caps, threaded rotary caps, and other types.
Working Principle of Bottle Cap Injection Molding Machine
Two sides of the mold are held in place by a clamping device. The hydraulic rod keeps the mold firmly in place so the cylinders feed the plastic into the mold. From the storage hopper, the plastic granules are put into the hot chamber through the movement of the cylinder. After that, plastic granules will be turned into glue and pumped into the mold to fill the empty cavities. The cooling process helps the molten plastic turn into a solid according to the shape of the mold. Each mold has a different cooling time for each plastic product design depending on each resin's wall thickness, thermal properties, melt index, and mechanical properties. When the mold opens, a part of the mold helps push the products out when they have achieved the desired shape.
Benefits of Bottle Cap Injection Molding Machine
High-Volume Manufacturing of Plastics
Injection molding is the most cost-competitive technology for manufacturing high volumes of identical plastic parts. Once the mold is created and the machine is set up, additional parts can be manufactured very fast and at a very low cost. The recommended minimum production volume for injection molding is 500 units. At this point economies of scale start to kick-in and the relatively high initial costs of tooling have a less prominent effect on the unit price.
Wide Range of Materials
Almost every thermoplastic material (and some thermosets and silicones) can be injection molded. This gives a very wide range of available materials with diverse physical properties to design with. Bottle caps produced with injection molding have very good physical properties. Their properties can be tailored by using additives (for example, glass fibers) or by mixing together different pellets (for instance, PC/ABS blends) to achieve the desired level of strength, stiffness, or impact resistance.


High Productivity
The typical injection molding cycle lasts 15 to 60 seconds, depending on the size of the part and the complexity of the mold. In comparison, CNC machining or 3D printing might require minutes to hours in order to produce the same geometry. Also, a single mold can accommodate multiple parts, further increasing the production capabilities of this manufacturing process. This means that hundreds (or even thousands) of identical parts can be produced every single hour.
Great Repeatability and Tolerances
The injection molding process is highly repeatable and the produced bottle caps are essentially identical. Of course, some wear occurs to the mold over time, but a typical pilot-run aluminum mold will last 5,000 to 10,000 cycles, while full-scale production molds from tool steel can stand 100,000+ cycles. Typically, injection molding will produce parts with tolerances of ± 0.500 mm (0.020’’). Tighter tolerances down to ± 0.125 mm (0.005’’) are also feasible in certain circumstances. This level of accuracy is enough for most applications and comparable to both CNC machining and 3D printing.
Hydraulic Bottle Cap Injection Molding Machine
Hydraulic bottle cap injection machines, as the name implies, are powered by hydraulics. While this method is very efficient, one drawback is that they cannot be allowed to sit idle. They must run continuously to maintain a constant temperature of the melted plastic. Startup and shutdown require time and special attention to avoid damage to the machine. During startup, plastic that has not reached its proper temperature needs to be discarded for recycling. During shutdown you may need to remove unwanted resin from the barrel and screw to prevent resin from hardening and clogging the barrel during startup.
All-Electric Bottle Cap Injection Molding Machine
Compared with hydraulic injection machines, the price of all-electric bottle cap injection molding machines is higher, but all-electric injection molding machines do not need to operate continuously, nor do they need to adjust the temperature. Injection molding is relatively stable and can be more efficient than all-electric. All-electric injection machines have no hydraulic system, so there is no risk of liquid leakage in the machine.
Hybrid/ Servo Hybrid Bottle Cap Injection Molding Machine
Hybrid bottle cap injection molding machines are highly efficient and economical. They integrate the advantages of hydraulic type and all-electric type machines, and are commonly used by many companies now. These machines have a moderate cost, and are quite energy efficient, which is important when energy costs are a major consideration. Hybrid injection molding machines use a servo motor to run a hydraulic pump, which provides the hydraulic pressure to provide power to the components of the machine. The clamping mechanisms are simpler, more accurate and durable, which greatly reduces the cost of maintenance. The servo hybrid type can supply higher injection pressure and clamping pressure than the all-electric types.
Main Parts of Bottle Cap Injection Molding Machine
The Machine Base Unit
Often referred to as the machine "bed", this provides a mounting frame for the clamp and injection units. The base unit must have dimensional stability, accuracy, and strength. The process of injection moulding imparts high levels of stress to the unit during use which have to be absorbed without undue deformation occurring. The presence of high cyclic stress loading during service dictates a rigid heavyweight construction of the unit. Modern machine base units are generally fabricated from heavyweight steel beams welded together using thick steel connecting side plates. Due to the relative ease of the manufacturing method employed, the machine design can be readily modified during construction to fulfill specific requirements as necessary. The base unit also acts as a housing for the hydraulic oil storage tanks. The pump and electric drive motor are often mounted on the back of the base frame or directly to the bottom of the structure.
The Injection Unit
The basic function of all machine injection units is that of:
- Melting and preparation of the polymeric resin;
- Pressurizing and feeding the molten resin to the mould under controlled conditions.
- Injection units are usually based upon two distinct designs of the system, the plunger and the reciprocating screw designs. The latter is the most commonly employed on modern moulding machines.
Solid granules of resin are drawn into the screw flights as the screw is rotated using the screw drive motor. Heat is supplied to the resin through the barrel wall and additionally by friction generated as a result of the shearing action of the screw. The screw geometry creates a reduction in flight volume towards the front of the barrel thus compressing the softening resin into a molten phase.
This process is often referred to as plasticizing. The pressurized molten resin is then metered through a ring valve or collar, into the cavity between the screw tip and the nozzle. The build-up of resin in front of the screw tip is often referred to as the shot or screw cushion. As the screw rotates, the screw cushion grows in size, forcing the screw to retreat up the barrel until the required cushion size is achieved. Once this is obtained, screw rotation is halted. At this stage, the injection unit is said to be primed and ready for the next operation, known as the injection phase.
To inject the molten resin through the nozzle into the mould, the screw is forced forward closing the ring valve in doing so. With the ring valve firmly seated shut against the screw shoulder, the screw cushion is thus pressurized. The cushion pressure builds until sufficient to force molten resin through the nozzle into the mould feed system. The applied pressure continues until the mould impression is full of molten resin. This sequence of events is referred to as the injection 'first stage' or high-pressure phase. If the injection first stage is allowed to continue beyond the mould fill point, overpacking of the moulding will result. Overpacked mouldings suffer from high moulded-in stress levels resulting in poor component dimensional stability and inconsistent mechanical properties.
On completion of the first stage of injection, the applied pressure is reduced to a level sufficient to avoid component overpacking. Conversely, over-reduction of pressure could result in component underpacking which leads to high component after-shrinkage and distortion. Known as holding, dwell, packing, or second-stage pressure, it is maintained until sufficient solidification of the feed system has occurred to allow the removal of the applied pressure altogether. When the second stage has been completed, the injection unit can be re-primed in preparation for the next shot.
The Clamp Unit
In order to inject the molten resin into the mould under considerable pressure, the mould must be sufficiently clamped together to resist the applied injection force. Under-clamping would result in the mould being forced apart creating a flash about the split line. Apart from providing sufficient clamping force for the mould, the clamping unit is also utilized for mould opening, closing, and sometimes component ejection when required. The hydraulic actuation cylinder controls the movement of the toggle assembly arms and linkages using collapsing the link assembly to open the moving platen and erection the assembly to close and lock the platens/mould. The clamping force is applied mechanically as a result of stretching the machine tie bars by the locking-out of the toggle link assembly contained within them. Due to the design of the linkage assembly, a mechanical advantage is generated on actuation which results in a force multiplication in the region of 20:1 being achieved over the applied piston loading. Setting of the clamping force is obtained by adjustment of the lock height which can be achieved by jacking the assembly forward or back on the lock jacking screw. Clamp tonnages can be calculated by measuring the resultant tie bar stretch generated by the subsequent locking down of the press after adjustment.
The Injection Molding Process for Bottle Caps
Clamp the Mold Based on the Tonnage Requirement
After completing the mold for the plastic bottle cap design, you will need to clamp the mold according to the tonnage requirement of your machine, which will allow you to connect the feeding system with the mold. Be sure to follow the tonnage requirement to ensure that your mold will hold its place during the production period.
01
Feeding the Plastic Materials into the Mold
Next, it’s time for you to feed the plastic materials into the mold. You will need to do this before starting the injection molding operation to ensure that the plastic materials will be ready when you start the production operation.
02
Using the Extrusion Mechanism
For plastic bottle cap production, you will need to use the extrusion mechanism, as this is the mechanism that works best to produce tube-shaped products. With the extrusion mechanism, you can create plastic bottle caps that will have the best design, along with the threading system inside the cap.
03
The Cooling Process of the Injection-Molded Plastics
Now, the extrusion process will be complete, and the injection-molded bottle caps will need to cool down before you can eject them from the mold. Depending on various factors, you will need to wait for different cool-down times for the plastic bottle caps.
04
Ejection of the Bottle Caps from the Mold
Now, it’s time to remove the injection-molded caps from the mold cavities. The mold will be able to handle thousands of production cycles, so you can repeat the process again as needed.
05
Maintenance Tips for Bottle Cap Injection Molding Machine

Perform Basic Maintenance Checks before and after Each Production Cycle
Before starting a new production cycle, it is important to thoroughly inspect the injection molds. Examine the surfaces of the injection molding die to make sure they are free of plastic or contaminants. Any foreign debris may cause interference when the tool clamps down and cause the plastic to seep into the parting area during mold injection. You should also be on the lookout for anomalous marks or damage on the mold’s surfaces. It is also good practice to inspect the final part from the previous cycle. This will be a good indicator of the mold’s performance. For example, excessive flash on the parting line may mean that the injection mold cavity and core are not clamping down correctly.

Clean the Mold Core and Cavity
Clean your mold after each production cycle to prevent the build-up of foreign materials. Cleaning can be done with the injection mold tool in the press or on the bench. Press mold cleaning is done after each production run, while on-bench cleaning takes place alongside major injection molding maintenance activities and is not done as frequently. Some resins will foul the molds quicker than others, so your cleaning cycle will depend heavily on the resin used. Wipe down the mold with a standard degreaser or mild solvent using a cotton cloth. Other techniques like dry ice blasting can help you clean the mold in place without leaving any residue. If the plastic molding tool has been removed from the machine for more extensive maintenance, it must be disassembled, and each part cleaned individually. One of the more efficient methods for doing so is to clean the parts in an ultrasonic bath. This allows you to clean every surface—even cooling channels and mold vents—that are hard to reach. The mold material must be carefully considered as some materials are not conducive to ultrasonic cleaning. In this case, traditional cleaning techniques must be employed.

Blow Out Dust, Dirt, and Water with Compressed Air
It is important to remove any dirt or dust that has settled on the mold surface during cleaning. The water used to clean the mold can also leave stubborn scale marks when it dries, especially on highly polished molds. The molds should be dried as soon as possible after cleaning. An injection molding technician can use compressed air to accomplish this. Cooling channels must also be blown dry as water can easily get trapped in these channels. Anti-rust coatings will make debris like dust or cotton fibers stick to the injection mold die surface. They may later end up on the injection molded parts, so care should be taken to carefully inspect the mold surfaces afterward.

Check the Mold's Runners, Sprues, and Other Places
It's important to inspect the quality of the mold runners, sprues, gates, and vents. All these features are critical to efficient production. Wear and material build-up are two of the most common failure modes and can cause parts to stick to the injection molding tools. Molds are most likely to wear at the plastic’s entry gate, so this area should be thoroughly inspected. Make sure there are no plastic buildup or surface blemishes on the runner or sprue, as these may impede the flow of plastic and cause sticking. Scratches from previous attempts to remove stuck plastic can further exacerbate the problem, causing future plastic to stick more easily. Sprues and runners must be cleaned and re-polished if flaws are found. Check that the hot runner nozzle tips are free of burrs.

Examine the Mold's Connectors and Hardware
Check all cooling water hoses, pipe connectors, and threads to ensure that there are no leaks. Remove pipes and fittings and clean off any potential build-up of calcium or other deposits. If the mold is not removed, ensure that all the bolts connecting the mold to the platen plates are properly torqued. If the mold is removed, inspect the platen plates for warping and rusting. Dents and burrs on the platen can damage the mold and reduce its effective lifespan. Any small burrs or other defects must be removed with a polishing stone or similar tool. Due to the softer metal of the platen, the mold fastening hole threads can get damaged over time, so these should be periodically checked. The use of a torque wrench is recommended to prevent over-tensioning damage to the threads. Check the platen for any deformation.

Before Storing the Mold, Make Sure It's Totally Dry
If the mold is to be stored for an extended period, it must be fully dried and protected beforehand. Moisture can cause corrosion even if the mold is sealed. Drying can be done with compressed air. An additional rust inhibitor is then needed—spray the entire mold to protect it from atmospheric moisture.
Specific Requirements
When it comes to cap molds and injection-molded screw caps, it is crucial to consider the specific requirements of the final product. The mold should be able to produce a cap that meets the required specifications, such as size, shape, and tightness of the seal. Additionally, the injection molding machine should be able to provide consistent and precise control over the injection process to ensure the uniformity and accuracy of each cap produced.
Types of Injection Molding Machine
As far as the injection molding machine itself is concerned, there are various types such as hydraulic machines, electric motors, and hybrid machines. Each type has its advantages and disadvantages. For example, hydraulic presses offer high injection power and versatility, making them suitable for a variety of applications. Motors, on the other hand, offer energy efficiency and faster response times. Hybrid machines combine the advantages of hydraulic machines and electric motors.
Throughput
When choosing an injection molding machine, it is also critical to consider throughput. If producing large batches, a high-speed machine with a large number of cavities may be ideal for high production rates. However, for smaller volumes or special requirements, a machine with lower capacity but higher flexibility may be more suitable.
Certification
Our company is accredited for meeting international standards in management responsibility, quality control, design control, process control, customer service, and other key criteria.

Our Factory
Located in Zhangjiagang City of China, our company is near many big cities of Shanghai, Nanjing, Suzhou, Wuxi, and Nantong, with convenient traffic.


Ultimate FAQ Guide to Bottle Cap Injection Molding Machine
Q: How are bottle caps injection molded?
Q: What material are bottle caps made of?
Q: What industries primarily use bottle cap injection molding machines?
Q: Why is injection molding preferred for bottle cap production?
Q: What features ensure the quality of bottle caps produced by these machines?
Q: Are bottle cap injection molding machines customizable for different cap designs?
Q: What is the typical production speed of bottle cap injection molding machines?
Q: What is the capacity of the bottle cap injection molding machine?
Q: How is the molding process controlled?
Pressure Control: The pressure exerted during the molding process affects the material flow, filling of the mold, and the final product's characteristics. Regulation of pressure ensures consistent quality and proper material distribution.
Injection Speed Control: The rate at which the molten material is injected into the mold impacts the final product's properties. Controlling injection speed helps prevent defects like air pockets or uneven material distribution.
Cooling Control: Once the material is injected and shaped within the mold, controlling the cooling process is essential. Proper cooling rates and durations ensure that the material solidifies correctly without warping or deformities.
Mold Design and Maintenance: The design of the mold itself, as well as its maintenance, influence the molding process. Well-designed molds and regular maintenance prevent defects and ensure smooth production runs.
Q: What is the energy consumption of the bottle cap injection molding machine?
Q: Can the machine be customized to produce different types of caps?
Q: What is the life expectancy of bottle cap injection molding machine?
Q: What is the level of automation of the bottle cap injection molding machine?
Q: What is the noise level of the bottle cap injection molding machine during operation?
Q: How is the temperature control during the molding process?
Q: Is there a need for a separate cooling system for the bottle cap injection molding machine?
During the demolding stage, the temperature of the plastic product should be cooled to a temperature lower than the heat distortion temperature of the plastic product to prevent the plastic product from being loosened due to residual stress or warpage and deformation caused by the external force of the demolding. Factors affecting the cooling rate of the product are: plastic product design. Mainly the wall thickness of plastic products. The greater the thickness of the product, the longer the cooling time.
Q: What kind of training is required to operate the bottle cap injection molding machine?
Safety Procedures: Learning and adhering to safety protocols for the operation of the machine, including emergency shutdown procedures, handling of molten materials, and use of personal protective equipment.
Machine Setup: Training on setting up the machine for production runs, including installing the appropriate mold, adjusting temperature and pressure settings, and loading raw materials.
Process Monitoring: Understanding how to monitor the molding process in real-time, including observing temperature, pressure, and other critical parameters.
Troubleshooting: Developing the skills to identify and troubleshoot common issues that may arise during the molding process, such as material flow problems or mold issues.
Quality Control: Training in quality control measures, including visual inspections and the use of measuring tools to ensure the produced caps meet specified standards.
Q: How is the bottle cap injection molding machine installed and commissioned?
Machine Positioning: Place the machine in its designated location, considering accessibility for operation, maintenance, and safety. Use leveling tools to ensure the machine is stable and properly aligned.
Power and Utilities Connection: Connect the machine to the power source, and if applicable, connect water and air supplies. Follow the manufacturer's specifications and guidelines for proper connections.
Mold Installation: Install the appropriate mold for the production of bottle caps. Ensure the mold is securely in place and aligned correctly with the machine. Follow proper safety procedures during mold installation.
Temperature and Pressure Settings: Set the required temperature and pressure parameters on the machine based on the material and mold specifications. This includes configuring the temperature of the mold, barrel, and nozzle.
Material Loading: Load the raw material into the machine's hopper. Ensure that the material is of the correct type and quality for the desired bottle cap production.
Startup Sequence: Follow the manufacturer's startup procedures, which may include gradually bringing the machine to operational temperatures, purging any residual material, and conducting initial test runs with no production.
Process Validation: Verify that the machine is producing bottle caps according to specifications. Monitor critical parameters such as temperature, pressure, and cycle times during initial production runs.
Q: What are the main parts of bottle cap injection molding machine?
Generally, injection molding machines work in a horizontal manner. The injection molding machine consists of a barrel (cylindrical pipe). A hopper is located at one end of the barrel. A hydraulic ram or rotating screw runs by an electric motor used of providing force is located inside the barrel. A heating element (heater) is attached to the barrel and circumstantially used to melt the molding material that comes down from the hopper.
On the other side of the barrel, a mold cavity is attached. Mold is located inside the mold cavity and a movable pattern is used in whole manufacturing. Mold is generally made up of copper, aluminum, and tool steels. The life cycle for different material molds is different. This can be selected as per requirement.
Q: How do bottle cap injection molding machines work?
We're well-known as one of the leading bottle cap injection molding machine manufacturers and suppliers in China. We warmly welcome you to or wholesale customized bottle cap injection molding machine for sale here from our factory. All products made in China are with high quality and competitive price.
cooler molding machine, High Speed bottle cap injection moulding machine, table top plastic injection molding machine